大家好,我是 “潇洒哥老苗”。
今天我带大家创建一个站,不需要购买服务器,只需要掏钱买个自己喜欢的域名即可。
涉及
- Vercel:免费静态网站托管
- Notion:内容后台
- CloudFlare:CDN 加速
- 域名
- nextjs-notion-starter-kit:以 Notion 为后台的网站
nextjs-notion-starter-kit
地址:https://github.com/transitive-bullshit/nextjs-notion-starter-kit
1. fork
打开该网址,然后 fork 该项目。
2. 修改项目名(可选)
如果 fork 后的项目名不喜欢,可以修改自己喜欢的。

3. 修改配置
在项目根目录打开 编辑文件site.config.js 文件,点击修改,如下:
编辑文件
然后修改几处内容,刚开始只需要看有中文描述的几处。
module.exports = {
  // where it all starts -- the site's root Notion page (required)
  // Notion 根页面的 ID
  rootNotionPageId: 'c811c01b7d824f5ba966f688ee37652b',

  // if you want to restrict pages to a single notion workspace (optional)
  // (this should be a Notion ID; see the docs for how to extract this)
  rootNotionSpaceId: null,

  // basic site info (required)
  name: '老苗', // 站名
  domain: 'laomiao.site', // 域名
  author: '老苗', // 作者

  // open graph metadata (optional)
  description: '专注技术、持续学习', // 网站描述
  socialImageTitle: 'Transitive Bullshit',
  socialImageSubtitle: 'Hello World! 👋',

  // social usernames (optional)
  // 社交账号
  twitter: 'laomiao_',
  github: 'miaogaolin',
  linkedin: '',

  // default notion icon and cover images for site-wide consistency (optional)
  // page-specific values will override these site-wide defaults
  defaultPageIcon: null,
  defaultPageCover: null,
  defaultPageCoverPosition: 0.5,

  // image CDN host to proxy all image requests through (optional)
  // NOTE: this requires you to set up an external image proxy
  imageCDNHost: null,

  // Utteranc.es comments via GitHub issue comments (optional)
  utterancesGitHubRepo: null,

  // whether or not to enable support for LQIP preview images (optional)
  // NOTE: this requires you to set up Google Firebase and add the environment
  // variables specified in .env.example
  isPreviewImageSupportEnabled: false,

  // map of notion page IDs to URL paths (optional)
  // any pages defined here will override their default URL paths
  // example:
  //
  // pageUrlOverrides: {
  //   '/foo': '067dd719a912471ea9a3ac10710e7fdf',
  //   '/bar': '0be6efce9daf42688f65c76b89f8eb27'
  // }
  pageUrlOverrides: null
}
改完后直接提交。
4. rootNotionPageId
从这个 ID 页面开始同步网站,该页面必须公开,选中下图 Share to Web。

ID 从网址上找,例如:

Vercel
下来做的是,将 Notion 的内容同步到 https://vercel.com/ 网站,等这个完了再解析域名即可。
1. Github
使用 Github 登录
2. 创建项目

3. Import & Deploy
导入 Github 上 fork 后的项目,import 后再点击 deploy,下来需要耐心等会。

Import

Deploy
4. 域名
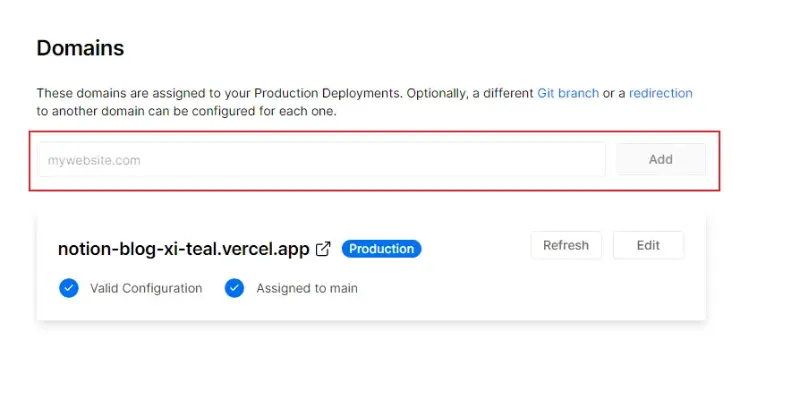
完成后点击 Go to Dashboard > View Domains,再添加自己的域名。

Domain
添加完后,再解析自己的域名,我的域名在阿里云购买的,先复制上图中蓝色框的内容,这个是在 Vercel 站上给你分配的域名。这个域名不方便,所以用自己的。

图解:
- 记录类型:CNAME
- 记录值:填写自己的

网站细节调整
1. 修改 copyright 时间
最新代码无需设置。
从根目录打开 components/Footer.tsx 文件,在大概 38 行处修改,如下图:

2. 默认 icon 和 conver 图
每个 notion 页面都可以设置这两个图,当如果也想在不设置的情况下,网站提供一个默认图,可以修改 site.config.js 如下配置:
defaultPageIcon: "https://laomiao.site/page-icon.png",
defaultPageCover: "https://laomiao.site/page-conver.jpg",
按照我这个地址,是把图片放置在了根目录下的 public/ 下。
3. 首页文章配置
这是我个人的文章属性:

其中 4 个拿出来说明下:
- Published 发布时间
- Tags 标签
- Public 是否公开
- Featured 是否好文章
Published 发布 和 Tags 标签在如下图中配置,展示列表中出现的信息:

文章列表信息
Public 用于筛选,确定是否在首页展示。
Featured 和 Published 用于排序。

如果不想展示的属性你这隐藏起来,不然会页面上展示出来,记着属性的顺序也会影响到页面的展示:

CloudFlare
也可以不使用 CloudFlare 加速网站,但是如果使用 Vercel 部署的网站在国内访问起来会比较慢,可以试试,反正我没用,用了发现速度提不起来。
1. 添加网站
打开 CloudFlare 网站,添加自己的域名,cloudflare.com,后面咱简称 CF。

2. DNS
找到自己购买的域名,然后修改 DNS 服务器,修改成什么样呢?
先打开 CloudFlare 后台,找到 DNS 服务器地址,如下:

然后修改域名的 DNS 服务器地址,如下:

CF 上解析 DNS,如下:

图解:
- 内容:复制该 IP 地址,这是 Vercel 的 IP。
- 代理状态:设置为仅限 DNS。
3. 规则
在 CF 上添加两条规则,记着要根据自己的域名配置,这些配置是为了解决 SSL 证书问题,具体的,咱没深究。

4. 边缘证书
点击 SSL/TLS > 边缘证书,关闭 Https,至于为啥,暂时也没深究,我在第一次操作时没有添加,网站访问速度还是,后面加上后好了,不知道是巧合还是什么。

扩展
1. 分析
配置都完了,现在可以再访问了,如果你还想分析网站的访问速度情况,可以打开 Vercel 的分析模块。
